This is really the crux of this ruleset.
The acid test is to present a mechanism of playing solo wargames where the AI is a genuine competitor. Naturally you will need to implement the movement, but the actions should be such that you are challenged every turn. One of the difficulties have already been mentioned, namely that you will have a limited number of units operating each turn. We could also roll for which units, but the amount of dice rolling would become overwhelming. Instead the AI will have three distinct types of engagement – Bold / Measured / Cautious. Once the units become engaged and the type of approach is revealed it should be easy to align units during every time. I will explain further below. The best way to work through the process is to actually start a game so let’s follow the action in France 1940.
I am going to play as the BEF attacking from the north of the table. The reason for declaring now relates to the flank actions. As a player I really want to choose whether this is a good idea. As the AI this choice is removed and we draw a card, again to create both uncertainty and change within the game. As a result in order to create a plan what I’ve got to play with.
The BEF Plan
The BEF units are;
1st Platoon – with 3 sections (3 units) / 2nd Platoon – with 3 sections (3 units) / HQ Section – 1 unit / Vickers Machine Gun – 1 unit / Universal Carrier – 1 unit / Matilda II Tank – 1 unit
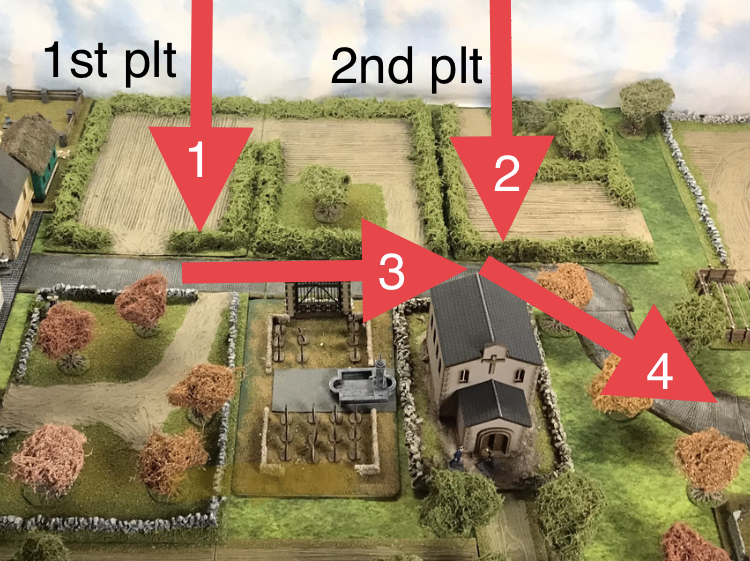
I’m going to split my forces (10 units) into two main lines of the two read arrows. I am not going to have any troops appear on the flanks.
My plan of attack is to advance 1st Platoon on the left to the line of the road. This will be supported by the Matilda II. Once cleared this will become cover for 2nd Platoon to advance to the road. Both platoons will advance east (3) clearing the remainder of the road (4) setting up HQ positions in the church.
I have a clear set plan of the BEF attack. However of the German forces all I know is that they have 9 units as a reconnaissance force.
Before we progress I can now identify a force to counter this with a balance in mind. The German reconnaissance force will comprise of;
1 Motorcycle Squad – 1 Unit / 1st Platoon (3 units) / 2nd Platoon (3 units) / 1 HQ – 1 unit / 1 anti-tank rifle squad
The next step is to draw a card as I think flank support is realistic;
Number card – 1 unit / Picture card – 2 units / Joker – 3 units
I draw – a Jack of Diamonds. 2 of the 9 are going to appear on the flanks. I elect two units from 2nd platoon. This is a choice as I need to have something to counter the Matilda II and the motorcycle squad appear in all three types of subsequent plans.
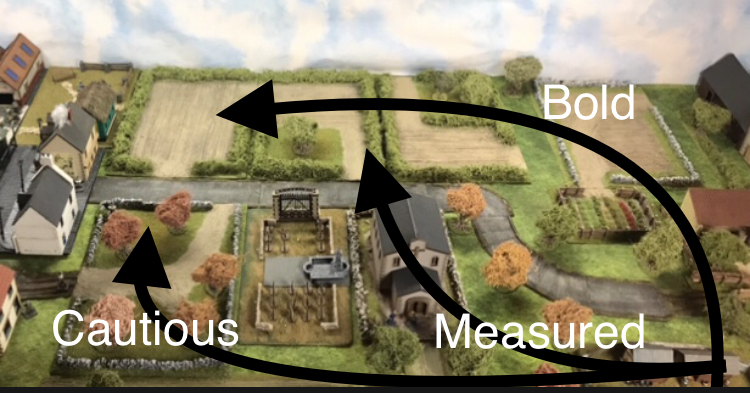
Now with the remaining units I create 3 plausible plans.
Plan 1 – Cautious – Set up HQ in the farm area alongside the remaining 2nd platoon section. Direct 1st platoon from the defensive position to the church and graveyard, supported by the AT rifles. Hold these positions. The teams are supported by the motorcycle squad. They will race below the church onto the track, dismount and occupy the orchard. The two flank units will ideally arrive in the town and the road will be cleared for armour to arrive later that day. Do not advance beyond the road North.
Plan 2 – Measured – Allocate remaining 2nd Platoon at the farm area as reserve. Deploy remainder across the baseline. Advance 1st Platoon (2 Squads) south of orchard advancing north. HQ and anti-tank to occupy the church. Remaining 1st platoon squad occupy graveyard up to road. Support advance on right with motorcycle squad. Once infantry in place advance motorcycle into town and occupy houses by road. Once in place infantry advance clearing fields and move up reserve into church.
Plan 3 – Bold – Full speed motorcycle team on road right to left to occupy buildings at start of town. Drive 1st platoon on right flank and clear. Then move west to clear second field. 2nd platoon squad, HQ and anti-tank occupy church. When flank arrive attack enemy in closest field and drive through. Attack any enemy units.
In this game the next stage is to place markers on the table which indicate the general position of all three plans. This is tricky I appreciate.
What I am looking for (and perhaps close your eyes for this) is the sense of (in this case) the BEF 1st platoon advancing. There is an undulating field ahead with a hedge line containing who knows what? This might be early morning, a little chilly in mid-May, or action after a long March with an unforgiving Sergeant. Where will the enemy reveal itself?
I place all BEF troops on the table as per the plan and the German markers on top of one another at the farm section in the bottom right of the table.
Turn 1 – BEF
There was not a random event and with a modest “3” in unit movement (plus 2 for attacking force) I moved the 3 infantry units forward behind the Matilda II. I could not use the remaining dice as all four units had moved.
Turn 1 – AI
Not
Whilst we use the AI markers we ignore the points 1 to 7 until the figures are on the table.
The German markers now moves – Bold 12” / Measured 8” / Cautions 6”.
At the end of Turn 1 the table looks like this. There is no direct line of sight. The three approaches are magnified with the British advance highlighted in red.
Remembering my point about the BEF you can now ask yourself are the Germans in sight? Again remember at this stage, at a distance, soldiers can here noise, see things – an enemy force or trick of the light? Perhaps it’s raining? Even early morning fog?
At a fairly early point the bold units of any game are likely to be the ones who are in the eyeline of your forces. As soon as this appears realistic the AI is paused. We then roll a dice to see whether the marker in line of sight is fact or fiction.
In the example of this game this occurs in Turn 2 as the bold motorcycle squad races across the road with the Matilda II coming the other way. In the confusion we roll a D6.
1/2 Bold – 3/4 Measured – 5/6 Cautions
Note if I roll 3 to 6 it simply means the Germans are not operating in a Bold manner and the marker is removed. The tank crew were mistaken.
When we next need to test we then follow the same process but;
1/3 Measured or 4/6 Cautious
Finally it is possible that more than one marker are in line of sight at the same moment. Let’s say Bold and Measured (the motorcycle squad would be visible for both) we roll a D6. Whichever of the three is identified means we remove the other two markers. If here it is the Cautious marker and it is still out the figures ARE placed on the table.
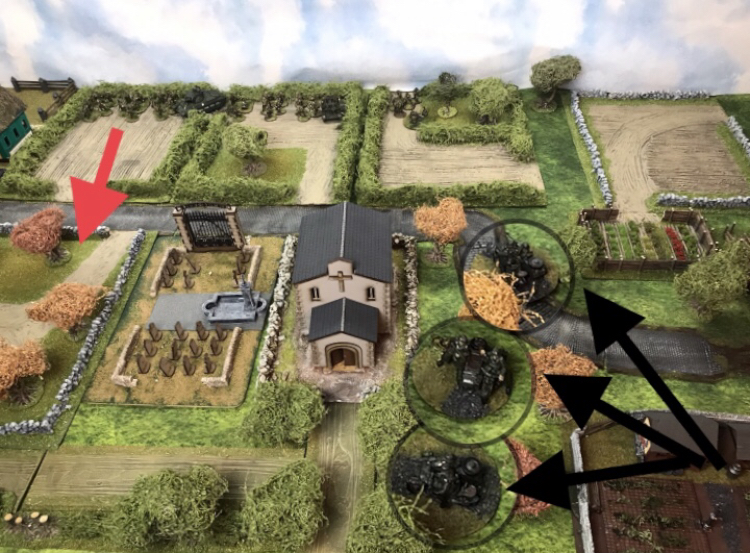
With that said I roll – and it’s a “1”. The AI is taking a “bold” strategy and the “cautious” and “measured” markers are removed.
I place the AI figures on the table and, as the marker was detected in the AI phase (and not that of the player) the turn ends.
Both sides now have their forces on the table. What happens next?
